Tuesday, December 21, 2010

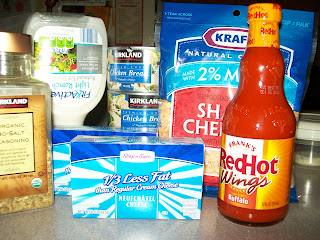
Buffalo Chicken Dip!

I may have stated that "Cheesy Potato Casserole" is my favorite, but "Buffalo Chicken Dip" is right up there with it! :) First, I have a confession to make! I am a BUFFALO LOVER No, I do not live home home on the range, but I love buffalo flavored dishes. I love buffalo sauce, buffalo wild wings, and of course the new "Blazin' Buffalo Pringles." If you haven't tried them, they taste like BWW in a chip! It is actually kind of impressive.

There are so many ways to make this recipe. You could use real chicken, put it in the oven and all that jazz. However, this is simple (great for parties) and you can use the stove or crock pot. 

Ingredients:
3 cans of chicken (10 oz)
2 boxes of cream cheese (8 oz)
3/4 cup buffalo sauce (Frank's Buffalo Wing Sauce is the best)
1/4 cup ranch dressing (some may prefer Blue Cheese)
1 3/4 cup shredded sharp cheddar cheese (1 bag)
Seasoning (I shake a little in here and there) 


First, open all the cans of chicken and put them in a pot/skillet on the stove or the crock pot. Then, add the Frank's Buffalo Sauce. Cover all the chicken with the sauce. Then, add the softened cream cheese. You may want to microwave some of the cream cheese in another bowl before hand to make it easier to stir in. (Do not put the cream cheese in the microwave in the foil... you may see sparks and your garbage disposal may start going off if connected to the same outlet... hmmm maybe I know from experience). Then add the shredded cheese. Keep stirring until the cheese is completely melted, then add the ranch dressing. You may want to add more/less ranch and buffalo sauce depending on how hot your want your dip. The ratios given are for a little zest, but not too blazin'. Remove from the stove and enjoy! :)


You can eat it with tortilla chips or Fritos. Again, I think these are great with Frito Scoops! You can also eat with with celery sticks. I dare you to make some for your next holiday party. 


Cheesy Potato Casserole!

This is my favorite ever! :) I got this recipe from the lovely Mrs. Julie Edwards. If you make this, I can guarantee it will be a favorite wherever you take it. If you want leftovers, don't take it to a potluck.

Ingredients: 
1 package of hash-browns (shredded or cubed)
1 stick of butter
16 oz. sour cream (1 tub)
4 cups shredded cheese (sharp cheddar is my favorite)
1 can cream of chicken soup.

First, preheat your oven to 350 degrees. Then, melt the butter in the microwave. Combine the melted butter, sour cream, soup, and cheese in a big bowl. Then, combine the frozen hash-browns to the mixture.
 
Spray a 9 by 13 pan and spread the mixture in the pan. You can top with cornflakes or anything else for a little crunch if you prefer. :) Sometimes I do half with cornflakes and half without. Put it in the oven for 1 hour! ENJOY!

Chili Chippy Dip!

This is a recipe that is soo easy and so delicious! It is great for any occasion. I personally like to make it when I am studying because it is quick, filling, and a great finger food. I can not take credit for this creation though! My boss gave it to me! It is so easy even kids can do it. :)


Ingredients:
1 box of cream cheese (8 oz)
1 can of chili (with beans)
3/4 cup shredded sharp cheddar cheese (half the bag)

First, you just need a plate. I use a Pyrex, glass, pie bowl (I am not quite sure what you call it.) Then, you spread the cream cheese on the plate, to make a nice bottom layer. Then, open the chili and spread it over the cream cheese and this will be the second layer. Then, sprinkle the shredded cheese on top. Then, pop it in the microwave until all the cheese is melted! You are done! :) You can eat it with tortilla chips or Fritos. I personally feel like "Frito Scoops" are the best.

This is what it looks like before the cheese is melted. :)

ENJOY!

Sunday, December 19, 2010

Green Bean Casserole

I have always wanted to make green bean casserole, but I wanted it to be unlike the ordinary green bean casserole that everyone makes. Everyone makes the kind with the soup and the "French Onions" on top. This casserole is delicious! However, I wanted to try something slightly different and it was a success. I would alter a few things if I made it again. However, I think it is definitely worth sharing.

Ingredients:

1 lb. bag of frozen green beans (I got mine at Aldis!)
1 cup chopped onion
2 Tablespoons butter
2 Tablespoons flour
1 cup milk
3/4 cup sharp cheddar cheese
1/2 cup sour cream (The healthy alternative to sour cream is "Greek Yogurt" if you are looking for a substitute. It is better than plain yogurt because it is much thicker and helps keep a similar texture.)
1 Tablespoon sugar
1/2 teaspoon salt
2 cups box stuffing

First, preheat the oven to 350 degrees before you get started. Then, put the green beans in a 9 by 13 pan. I use Pyrex glass pans and they work great. Before you put the green beans in the pan, you may want to rinse them off and make sure they are thawed.


Then, in a large skillet/pot you will start to sauté the onions in some melter butter. You will continue to do this until the onions are nice and soft! Then, add the flour in with the onions and butter. Then add the milk, and bring this mixture to a boil. Once it is brought to a boil add the cheese, sour cream, sugar, and salt. Continue to stir it until it is a nice thick cheese sauce. Then, pour the mixture over the green beans in the pan.


Then, you will top it with a layer of the stuffing. I tried the stuffing because I had never done it before. You can also top it with the "French Onions," corn flakes, or nothing. I personally like a little crunch with my green beans.


Then, you will just stick it in the oven for 25-30 minutes and take it out. ENJOY! you never thought you could make casserole from scratch! Now you can! :)

*I forgot to take a picture when it was done... but it was delicious looking with all crunchy brown stuffing on top.

Sunday, December 12, 2010

Mint Chocolate Chip Cookies


Green cookies? Yes, because they look beautiful, festive, and as a young child I had a love for Dr. Seuess' "Green Eggs and Ham," so this year I will have green mint chocolate chip cookies!

*I can not take credit for this recipe. It was Betty Crocker's prize winning recipe in 2010. :) However, I take credit for making them! :)


Ingredients:
1 lb Betty Crocker Sugar Cookie mix (like $1. 50 at Walmart)
1/2 cup butter (1 stick)
1/4 vanilla extract (it calls for mint, but you will get plenty of mint flavor with the other ingredients)
1 egg
6 drops green food coloring (try other colors... I see an art lesson coming on...)
1 cup creme de menthe baking chips (a.k.a. finely chopped Andes mints. If you buy the bag it is 2 cups)
1 cup semisweet chocolate chunks (If you buy the bag, you will only use half)

*Preheat oven to 350 degrees!

First, mix all of you ingredients together in a large bowl. Start with the cookie mix, egg, softened butter, food coloring, and extract. Then, fold in the baking chips and chocolate chunks. Then roll in small balls and place on cookie sheet.


You will bake them for 8-10 minutes. This is something that you will have to watch carefully. It is more difficult to tell if they are done because of the green color. Let them cool and then you are ready to serve!! :) Maybe serve them as "Grinch Goodies"?

Sausage Balls!


The holidays are coming upon us which means finger foods, fat, and sweets. I am hoping that my blog will keep up with these traditions and maybe add a few new ones. Many families have the tradition of making sausage balls. They are simple, quick, yummy, and delicious. They are great for family gatherings, holiday parties, quick snack, or brunch. Or, if you are like me, you can just make them and eat them for a Sunday afternoon snack while studying. 

Ingredients:
2 cups Bisquick (If you are healthy, use whole wheat, or make your own)
1 lb cheese (Most cheese comes in an 8 oz bag. So, you need to buy two!)
1 lb  ground pork sausage (This is one cylinder roll, for those that are unfamiliar)

First, preheat the oven to 350 degrees. Then, mix all your ingredients into a bowl. The goal is to get all the ingredients together in a large ball. This is easily done by kneading it together like dough. It may seem odd at first because their is not liquid to keep everything stuck together, but the sausage will not let you down!

Continue doing this until all the ingredients come together. It should look a little something like this...

Then, you will start rolling the mixture into small balls. They are about quarter-size spheres (sorry for the elementary math explanation). If you use the entire recipe it should make about 60 balls.


Bake for about 10 minutes, or until the sausage balls are golden brown. The cheese will be melted and the sausage will be cooked. Make sure they are done, no one wants a doughy sausage ball!

Friday, December 3, 2010

Homemade Bagel Bites

Forget those frozen bagel bites! Make your own, it is kind of the easiest thing since sliced bread! :)

Ingredients:
Mini Bagels
Shredded Mozzarella
Pepperoni (or other toppings)
Marinara sauce

Well, you preheat the oven to 400 degrees. Then, slice all of the bagels in half. Add sauce on top, then shredded cheese, then your toppings. It is that easy. Put in the oven for 10-15 minutes and you are done! :)


Cream of Mushroom Chicken

Alright, this was my first attempt at making the easy cream of mushroom soup with chicken and rice, but I did spice it up a bit. :)

Ingredients:
3 chicken breasts
1 can cream of mushroom
1 cup rice
1 cup water
1 tablespoon butter
Paprika
Pepper
Parsley
Bacon bits (optional)

First, you will preheat the oven to 375 degrees. Then, you will mix the rice, water, and cream of mushroom soup and place them in the bottom of a small cake pan or casserole dish. Then, you will place the raw chicken breast on top of the mixture and spread melted butter on top. Then, shake paprika, parsley, and pepper on the chicken, and top with bacon bits. Cover the pan and put it in the oven for 45 minutes. :) The chicken should come out nice and juicy and very yummy!!

Saturday, November 6, 2010

Blueberry Muffins :)

Alright! I have found the perfect recipe for blueberry muffins! It is wonderful and it has a special ingredient... which is actually one of the staple ingredients in my kitchen, so that could be why I love it so much! However, I made three dozen last night and by this afternoon they were all gone through Alumni breakfast for homecoming and people eating them on our homecoming float! No, I did not buy them at a bakery. I made them (yes, me) from scratch and I am so excited to share the recipe with you. :)

Ingredients:
4 eggs
1 cup sugar
1 cup brown sugar
1 cup vegetable oil
2 teaspoons vanilla extract
4 cups flour
1 teaspoon baking soda
2 cups sour cream
3 cups blueberries = 1 lb.
1 teaspoon cinnamon
1/2 teaspoon nutmeg

The recipe that I tweaked to create this recipe said this would make 2 dozen. However, I made three dozen regular medium sized muffins. :) Splendid.

First, beat the eggs and add the sugar to the eggs while beating. Then add the oil and vanilla. In a separate bowl, mix together the dry ingredients (flour, spices, salt, and baking soda). Add the dry ingredients to the egg mixture and add the sour cream. Then, just fold in the blueberries (I mentioned the art of folding in an earlier recipe). I just bought 1 lb of frozen blueberries at Aldi's for 2.99. No need to thaw, just throw in! It is that easy folks. :) Then, I drizzled some brown sugar on top before I put it in the oven. This is kind of the best part and turns it into a bakery-quality muffin!


Bake in the preheated oven at 400 degrees for 20 minutes. They will be done. :) So, yes I have one muffin pan, so I cooked 3 dozen in 1 hour.


Beef Stroganoff

Alright, I know in previous posts, I have mentioned God's gifts to women... BOX MIXES. However, you always feel better and your self worth increases two notches who you make things from scratch. So, I decided that I was going to make BEEG STROGANOFF from scratch! So, I did... and it turned out splendidly. 

I found a recipe and then tweaked it. I also cut the recipe in half and I had enough to feed a family of four easily. So... here is the version I used, which is what you all want to know anyway. 

Ingredients: 
1/2 bag egg noodles (bags come in 12 oz)
1 can of mushrooms (you can use fresh if you want, I used can and it turned out great)
1 small onion chopped
1/4 cup melted butter
1 lb. ground beef
3 tablespoons flour
1 cup beef broth
1/2 cup sour cream
salt and pepper

Side note: When I made this it was very meaty, which I like. So, if you want more sauce... just put in less meat and it will be cheaper that way too. :)

First, you will boil your egg noodles on the stove, just like any pasta! Easy! I always add a little bit of olive oil, so that they do not stick together.

Next, you will chop your onion up and saute it in a skillet. I put the butter in with it to sauté. If you use fresh mushrooms you would put them in the skillet at the same time. However, I used can, so I put them in with the onions when the onions were almost done (soft). I did this so that the mushrooms would not get soggy. 

In another skillet add the beef and brown it until it is done. Then, mix in the flour, and beef broth. Stir it until it starts to thicken up. Then, add the onion and mushroom mixture and stir in the sour cream. Add salt and pepper on top. Continue cooking it until it is hot and warm, but do not boil it. 

Once the egg noodles are done, drain them and then pour everything on top. :) DONE! Serve it with some salad and bread for a yummy meal. 


This is not the best picture! This was the leftovers. It was so good and I was so excited about cooking that I forgot to take pictures of the process. 


Cinnamon Pecan Pear Muffins :)

Many times you find yourself looking for recipes in order to cook something to use up your leftovers. This is what frugal, domesticated women do in my eyes. If you buy all of your food little by little for each specific recipe. You could start spending a fortune. You need to always have the staples: spices, onions, potatoes, etc. Or in my kitchen the staples are sour cream, cream cheese, ranch, etc. Just kidding. Maybe next year I will have to start a more healthy blog. Anyway, over fall break I had the opportunity to go pear picking. It was an absolute blast. I have actually never gone fruit picking before, if I can recall. Which is sad, because my mom always tells me stories about how she used to go strawberry picking and ate so many in the field that she started to break out in hives. Anyway, I had around 2 dozen pears and I had no idea of what to do with them. So, I decided to make pear muffins. Pears are similar to apples, but more juicy. So, pear muffins are similar to apple muffins, but are more moist. Sounds perfect to me, and they were. :)

Ingredients:
3 cups flour
2 cups sugar
2 teaspoons baking soda
2 teaspoons ground cinnamon
1/2 teaspoon salt
1 teaspoon ginger
2 eggs
1 cup vegetable oil
1 teaspoon vanilla extract
about 6 medium pears (I used about 8 because they were smaller)
1/2 cup chopped pecans


First, you need to gather your pears. This means you need to go to the store, or if you are lucky like me, go PEAR PICKING! 


Then you need to remove the skin off the pears, because we do not want those in our muffins. YUCK! I used a potato peeler, but you can use a knife, or any other sharp object that you wish (make it safe, get your tetanus shot).


Then you will need to core all of the pears, and cut them into fine little pieces. Let's use some logic, how big of pear chunks do you want in a pear? Consider the size of the muffins, how many pear pieces will be in each muffin, ratios... Ok, I love math I am getting ahead of myself. Just cut the pears. :)


Then you will need to make sure you chop your pecan up. Sometimes you can buy chopped pecans at the store in the bag. However, I would chop them a little bit more AND it is always cheaper to buy stuff that is not prepared, like pre-chopped. Chop if your self. :) Save a dime.


Next, you will combine flour, baking soda, ginger, cinnamon, and salt in a large bowl. In another bowl, combine eggs, vanilla, and oil. Combine the wet mixture to the dry mixture and fold in pears and pecans. If you do not know what fold means... if means to gently pretend like you are actually folding the batter, this will make is so your pears do not get leak all their wonderful juices into your batter. :) If you are making blueberry muffins, folding is important so that you do not have purple or blue muffins. I did not do this once, they were tie-dyed purple, but I have to admit... it was kind of cool :)

Then put paper muffin cups into your lovely muffin pan. Then fill about 2/3 of the way with the muffin batter. It should look a little something like this. :) Then put it in the oven for 30 minutes at 350 degrees. So, yes you should have preheated at the beginning of this recipe.

*I also like to sprinkle a little brown sugar on them before they go in the oven. Then makes a crunchy streusel topping without the big mess!

This recipe will make two dozen!! So, if you are a cheap college student and only have one muffin pan, put it in the oven for 30 minutes and then do it again. :) 


Tuesday, November 2, 2010

Roasted Pumpkin Seeds

So, everyone (who did not have a deprived childhood like me) has carved a pumpkin. My first real pumpkin carving was this Halloween. However, that is another story. Anyway, DO NOT WASTE YOUR SEEDS!  You are going to carve a pumpkin at least once a year, so you are going to use this recipe once a year. It may sound like a weird mixture, but it has gotten great reviews! :)

First, separate all the seeds from the goo, guts, inside of the pumpkin. If you have a simple way to do this, please share. It was a pretty tedious task. However, when you have help, things always go by faster. ;-)

Once you have separated the seeds from the goo, you will need to wash the seeds and try to get more guts off of them. I used a colander to try to help drain my seeds and wash the pumpkin off of them. When you are done, you will still have some pumpkin. Don't worry it is not the end of the world. It will eventually roast off. :)


Ingredients:
2 cups pumpkin seeds (I had 4 cups from two large pumpkins... so I doubled this)
1 1/2 tablespoons melted butter
1/2 teaspoon salt
1 teaspoon Red Robin seasoning (this is basically seasoned salt, garlic, and paprika).
2 teaspoons Worcestershire sauce (I truly use this in everything!)
1 teaspoon cinnamon
1/2 teaspoon ginger
1/2 teaspoon garlic powder

Preheat the oven to 275 degrees. Mix all of the ingredient together in a small bowl. Dump the mixture into a large bowl with all the seeds and stir. Then, lay them out on a baking sheet and put in the oven for 1 hour. Remove from the oven and enjoy! :)

BEFORE!
AFTER!


YUMMY! :)

Garlic Parmesan Chicken

This recipe is so easy and it is so good! If you are looking for something you can prepare very quickly and pop in the oven, while you go to TJ Max and pick up your phone that you left on the counter while shopping earlier, then you have found it! (please disregard my previous comment... it did happen... but that is another story).

Ingredients:
4 Tablespoons olive oil
1 clove minced garlic
1 cup dry bread crumbs
2/3 cup grated parmesan cheese
1 teaspoon basil
1/4 teaspoon ground pepper
6 boneless, skinless, chicken breast halves

First, preheat your oven to 350 degrees. Mix your olive oil and minced garlic together in a bowl and then mix your bread crumbs, cheese, and spices together in another bowl. Dip chicken in oil mixture and then cover with dry mixture. Put all the chicken on a pan, pop in the oven and bake for 35 minutes. When it is done you will have some yummy chicken. Put it on a bed of spagetti or marinara sauce if you wish, or eat is plain. :) This is definitely a soccer mom meal, take it, use it, and let me know what you think.

God's gift to busy women- BOX MIX!

Ok! I just thought I should put something on here that is not created from scratch! Just because you are a beginning cook with a drive to be domesticated and become a great wife and mother someday doesn't mean that you have to ditch the wonderful things that God has given us. He gave us cake mixes, mac and cheese, lunch meat/bread, and hamburger helper. Do not forget these things.

So, just because you could make an elaborate dessert if may be easier and worth your precious time to just make a box mix cake.

I will tell you the secret to these. Follow the directions on the side, watch the cake, take it out when golden brown, and ice it with your favorite icing (mine is funfetti). It will look like a million bucks! DO IT! :)


Also, Jesus (my apartment-mate... yes her last name is Jesus) made a pumpkin pie that looked simply splendid. I just couldn't resist snapping a picture of it. :) Maybe I will have guest bloggers one day and they can also share their secrets with you.

Zucchini Bread or Zucchini Loaf?

The next recipe is pretty much amazing! :) So, I really wanted to make some Zucchini bread for someone special for their birthday. So, I first had to invest in a loaf pan. It was $5 at the supermarket! This is not a bad price considering the disposable ones were almost just as expensive. Every kitchen purchase is an investment. At least that is how I am justifying my purchases. :) Speaking of purchases, I also had to buy a grater to grate the zucchini. So, I purchased one at Ross for like $3. This is not a bad price considering it is Kitchen Aid and PURPLE! Yes, nothing will match, but who cares it will make me cheerful and happy whenever I see it.

Ingredients:
3 cups flour
3 eggs
2 cups sugar
1 cup vegetable oil
2 cups grated zucchini
1 cup semi-sweet chocolate chips
2 teaspoons ground cinnamon
1/4 teaspoon baking powder
1 teaspoon baking soda
1/2 cup sour cream
chopped walnuts (optional)

First, preheat the oven to 350 degrees. You will need two loaf pans for this recipe. If you remember from above, I only purchased one. So, I also used a small square cake pan to cook the other half in. This was actually perfect because I had loaves of zucchini bread and small brownie-like pieces of zucchini bread.

Beat together the eggs, sugar, and oil. Blend in the grated zucchini and then the sour cream. At the end, mix in the flour, baking soda, baking powder, and cinnamon. Then, stir in the chocolate chips. Once the ingredients are blended together in a batter-like mixture pour half into a loaf pan and the other half in the cake pan, or honestly whatever baking ware you have available.

Bake for 80 minutes. For those of you who are bad at math... this is 1 hour and 20 minutes. However, check it a few minutes before, because every oven is different. Do the toothpick test! It is so fun. :)

I made one pan with chopped walnuts and one without. It is totally your preference.

ENJOY! :)


Fun, Festive, Fajita Friday!

So, some of you may be wondering when someone with a schedule like mine has time to cook? Well, the answer is quite simple. I am not up on the new YOUTUBE videos. I did not know there was a three year old girl who cried over Justin Bieber until months after it happened. I was so out of the loop. Anyway, I also don't watch T.V. anymore, which could be a good or bad thing. However, I relieve stress, create masterpieces, and fill my stomach all at the same time. You should try it. :)

So, many Friday nights ago I decided to have Fajitas. :) I don't know if I can really call this cooking? I mean it was more like preparing food and putting them in dishes. However, it was delicious, easy, and precious! So, I figured that everyone and their sister would want to start having Fajita night! I am! Do it! :)

Ingredients:
Flour Torillas
1 Orange Pepper
1 Red Pepper
Grilled Chicken Breast strips
Chopped onion
Salsa

Various toppings:
Shredded cheese
Olives
Tomatoes
Lettuce
Sour Cream
Queso 
Have some tortilla chips on the side and have a party. :)

Directions: I must forewarn you that there is no measuring done in this recipe. Put in as much as you like and leave as much as you like out, that is what cooking is all about. Dump a couple of handfuls of frozen chicken breast strips into a skillet and add some Worcestershire sauce. In another skillet, pour in some olive oil and sauté your chopped peppers and onions. I chop the onions, but cut the peppers in strips (just cause that is the way they do it on T.V.) :) Once the veggies are sautéed and the chicken is soft and heated, mix the two together and add salsa to the skillet. Stir and serve! :) It is that easy folks. Top with all your favorites and enjoy a night of fajitas and fun!!

You can even place all the food on the coffee table and have a movie night with your fajitas. :) We are getting fancy folks!


EPIC FAIL

So, today is November 2nd and the last time I posted a blog about cooking was on October 1st. I want to apologize to anyone out there who has been reading this and anxiously awaiting the next recipe from the kitchen of Leah Kniffen. From my knowledge, there is not many of you, so there are not too many people that I should be disappointing. However, I am disappointing myself. I had a goal, and I did not successfully complete it (which is a rarity for me). However, my goal has halfway been reached. I have been cooking. The issue is that I have not been blogging about my cooking. I have been enjoying the splendid things that have been baked, stirred, sauteed, etc. over the last month. However, your mouth has not had the privilege of watering over my pictures and instructions for how to create these delicious treats. My New Year's resolution, which was not made on New Years still holds true. I will continue this blog. I will continue to make food. I will continue to become domesticated and I will continue to get FAT :)

Friday, October 1, 2010

Cheesy Garlic Bread

This is the easiest way to make bread and the cheapest! Don't buy anymore of that frozen Texas Toast! It is good, but this is better! :)


Ingredients:
1 loaf French Bread
Butter
Garlic Powder
Shredded Cheese
Basil
Parsley

**Preheat oven to 375 degrees!

I always have a loaf of French bread in my freezer. Whenever, I want to add some bread to a meal I just cut 1/3 of the loaf into slices. Then, I butter one side of the bread, and shake some Garlic Powder, Basil, and Parsley on each piece. Then, I add some shredded cheese on top! Pop in the oven until it looks crunchy and take it out! YOU ARE DONE! One loaf costs less than a $1.50, so you are adding about 8 yummy bread slices to your meal for 50 cents. :) I also like to make a little plate of seasonings, olive oil, and Balsamic Vinegar for dipping! It is an Italian restaurant people! :)

Stuffed Pasta Shells

Alright! This is such a fun recipe to make because you get to use your hands and stuff things. :)

Ingredients:
I package Jumbo Pasta Shells
I container (15 oz) Ricotta cheese (you will find this by the cottage cheese)
1/3 cup grated Parmesan
1 onion
Spinach (1/2 a bag of baby spinach)
Shredded Mozzarella
Ground Beef (one small package)
1 Jar of Spaghetti Sauce

The first thing you need to do is boil your shells, so they are nice and soft. Then you need to brown your ground beef. Add whatever spices you normally add when doing this. I like to add salt, basil, Italian seasoning, Parsley, etc. The more spices the prettier it will look! Never forget this! In the mean time, sauté some onions and cook your baby spinach in a skillet. You want your onions to be soft and you want your spinach to be cooked. This does not take too long. Once the beef is done, and the onion/spinach mixture, mix them together in a large bowl. Add the entire container of Ricotta cheese. Once, the shells are done, let them cool. The only reason behind this is so that you do not burn your hand while you are stuffing them! Then, stuff the mixture into the pasta shells. Once they are all stuffed, dip them in sauce. Use the remaining sauce to drizzle over all the shells. Then put them in the oven for about 25 minutes. Take them out and sprinkle mozzarella cheese over all of them. Put the shells back into the oven until all the cheese is melted. :) Shake some more spices on top, if you like! ENJOY! Have some bread or salad to eat with it!

Loaded Potato Skins

Alright! Here they are! They are simple and they are spectacular! Loaded Potato Skins! I kind of think these are better than the ones at TGI Fridays, but I am not going to guarantee it!

Ingredients:
4 Red Potatoes
3 Tablespoons Vegetable Oil
1 Tablespoon Parmesan Cheese
1/2 Teaspoon Salt
1/4 Teaspoon Garlic Powder
1/4 Teaspoon Paprika
Sour Cream
Green Onions
Real Bacon Bits

The first thing you will do is preheat your oven to 475 degrees. Then you will cut your potatoes. I just cut two potato skins out of each potato. This means I took the red potato and cut two sides off. I kept the insides to make oven baked potatoes later and just cut them in cubes. Then you will mix the spices, parmesan cheese, and vegetable oil in a bowl. Then I brushed it onto the potato skin. I did not have a special kitchen brush, so I just used a clean paint brush! Remember, these are collage courses. :) Then I put them in the oven until the potatoes start to get a little brown. This should only be like 15 minutes or so. Then, remove the potatoes and add shredded cheese and bacon bits. Then put it back in the oven until the cheese is completely melted! Then you can remove the potato skins and top with sour cream and green onions! ENJOY! :)

Sunday, September 19, 2010

OREO Balls

Here it is! This is what you have all been waiting for! Oreo Balls! I added a little chocolate covered strawberries to it as well. You might be wondering why I would do such a thing? Well, my roommate got engaged this weekend! So, I had to make a cute little yummy dish! So, this is what I came up with!

Ingredients: 
1 pkg. Oreos
1 pkg. Cream Cheese
1 pkg. Milk Chocolate Almond Bark
Strawberries (optional)

*I doubled the recipe because whenever I make these they are always gone very quickly!

First, you need to open the box of Oreos and crumble them with your hands into a large bowl. Once they have all been crumbled, you can get out a hand mixer and start mixing the Oreos pieces. Then add the softened cream cheese and continue mixing until it has reached a creamy consistency.


Then you can start rolling the Oreo batter into small little balls. It is up to you on the size you want to make them! I usually make them a little bit smaller than a ping pong ball. :) Once you have rolled them all up, put them in the freezer until they harden. This will take less than 10 minutes. They don't need to be frozen, just colder, so they will not fall apart. Once they are cold enough, it is time for the CHOCOLATE! 

So, now you need to melt the Almond Bark! You can do this in the microwave or on the stove. I did it on the stove and used a double boiler. Well, actually I used two pots stacked on the stove (I don't own a double boiler.) I filled the botton one with boiling water, and then the top one with chocolate. Keep it on the stove, until all the Almond Bark has melted. 


Then you will dip the balls into the melted chocolate and cover them with this creamy sensation! When it is completely covered in chocolate, you will place it on a plate. Then you will place it back in the freezer until it is completely dried! 

You can use the extra chocolate to dip anything in. I used strawberries this time! Maybe next time I will use pretzels!


Then once everything is done drying you will have a nice little arrangement like this! :)